Sunday, September 30, 2012

Take Home Reading Log Bags

In my grad school classes we have discussed several times over that you can teach reading all day long to your kiddos but unless they get extra practice at home, they will never reach their full reading potential. At this point many of us begin to wonder "What if my students don't have anyone to read with them at home?" In my class we have books on each child's reading level go home twice a week. For some of these kids the books have 100+ words and for others the books may only have sight words with pictures in the sentences to help them read the rest.The most important thing is that these books are ALWAYS on the child's level, so even if mom and dad are too busy to read with them, the STUDENT should be able to read the story to THEM! I have some kids who tell me they read their story to mom in the car on the way to soccer practice or they read to dad in the car on the way home from After School Care. The children get to keep these paper copies of their books and add them to their home "library". By the end of the year my students have over 70 books they are able to read on their own at home. This is HUGE for helping them to grow as readers. 

At the beginning of the year, each child gets a "suitcase" to keep their paper books in safely while at home. We do "suitcases" because our Literacy program is called Journeys and our theme is "We are going on a JOURNEY through books!" What do you always take with you on a journey? A suitcase of course! I always go to the Dollar Tree and get cheap bags like the ones below for each child to keep at home as their "suitcase".

 
We make little card stock luggage tags for our suitcases with our names on them and tie them to our bags. These suitcases always stay at home and twice a week, when the new paper books come home, they add their new book to their suitcase to keep it from getting damaged.

When I send the stories home at night they go in the "Kindergarten Reading Log". This is just a gallon size Ziploc bag that has a paper taped to the front of it. On the paper we write the title of the story, the parents initial next to it showing they heard their child read the story, and then there is a place for a sticker next to the initials showing that we have seen that the story has been read and the story is at home (hopefully in the suitcase!).


I get the books from our reading series decodable reader book as well as from the website www.readinga-z.com. I have access to a subscription from one of my grad school professors because my school does not have it (yet! I am pushing it sooooo hard!). Also in the reading log bag is the new sight word for the week typed on card stock and hole punched to be added to our sight word ring. Each child is also given a "Sight Word Ring" to keep in their suitcase to practice nightly. 


Do any of you do reading log bags? If so, how do you do yours? I love new ideas that can help me to make mine better. Hope you all had a great weekend :)


Thursday, September 27, 2012

End of Apple Unit and Centers

This week we had a short week due to our statewide Catholic Schools Conference today and tomorrow which made this week FLY by! We finished up our apple unit this week with a few last minute apple activities. We had already tasted applesauce, apple juice, and apple butter so this week we tasted apple chips. We tasted the Golden Delicious flavor. 

 
I will be honest with you, these were not necessarily the biggest hit, hah! Only about half of the kids said they liked them, but I figured it was something they probably have not tried before and would be an interesting new experience. 


We also made these cute crafts I found on pinterest.

Now onto CENTERS- yay! Oh my word do I LOVE centers. There was a point last year where my class could not handle the freedom and the switching of centers and so we were not able to do them for awhile. So sad. Centers is consistently one of our favorite things in kindergarten so to miss out is no fun for the students OR the teacher!

Honestly I do not know what I would do without centers. I love that they are all educational, but they are fun and they also teach my little ones how to work with each other and get along.

In my class we have a pocket chart at the front of the room with our centers for the day listed. I downloaded the adorable pictures for the centers from Deedee Wills years ago and laminated them. They fit perfectly into our chart! This chart used to be for my old calendar but then I switched my calendar over to be completely done on the Smartboard.


Have a great rest of the week!!

Monday, September 24, 2012

Ten Frame Class Book

This year we are really hitting those ten frames hard. I feel like they have been implemented into almost all of our math lessons so far this year. Last week we took our class pictures for our Ten Frame Class Book that my grade partner found from http://www.k-5mathteachingresources.com/. If you have not been to this website yet, you need to check it out. It is AWESOME! Here is what the front cover of our class book looks like:

 This font is one of my newest obsessions from Kevin and Amanda's fonts for peas. It is called Pea KT Polkie Dot.

Then, on the inside pages, we had the numeral form and ten frame representation of a number on a piece of paper with the corresponding number of students in the picture holding the paper. So for example the number one page had the paper and one child holding it.


When we were all done, I printed off the pictures on regular copy paper, put them into sheet protectors and threw the cover together real quick for our first class book of the year. My students love reading our class books and especially love to see their pictures in them!!

Do any of you make class books?? If so, what are the topics you make them on? 

Hope you all had a Magnificent Monday!
 

Monday, September 17, 2012

Behavior Management Linky and Back-to-School Night Handout


When I saw this Behavior Management Linky I knew I just couldn't pass it up! My behavior management systems help with promoting good behavior in a positive way AND they are educational!! WOOHOO! In our class we have two behavior management systems: one for each individual student and one for each table. The individual student behavior management is our "Hopping in the right direction" system with magnetic frogs on our chalkboard (covered with bulletin board paper).


Each student has a frog with their number labeled on it. Every day each frog starts on the blue lily pad (the middle one). As the day goes on, if a students makes a good choice they get to "hop" their frog. When they hop, they move one lily pad to the left (this also helps with teaching left and right-- which can be so tricky!!) When they get told to "hop" enough times that they reach the purple flowered lily pad, they earn a sticker for their monthly sticker chart. The object is to get as many stickers on your monthly sticker chart as possible. When a student breaks a rule or is not following teacher directions, they have to "drop" their frog. A "dropped" frog makes it harder for them to get to purple and earn stickers, but it is still possible. If a student makes it all the way to the lily pad that is the furthest on the right, they have to pull a sticker off their monthly sticker chart (remember, the object is to have as many stickers on that monthly chart as possible... you'll read why below!!).

The table behavior management is a little different. This is to mostly reward tables who are consistently following directions and working at an appropriate noise level. When a table is following directions, they earn a tally. When the table earns 5 tallies they get an automatic sticker on their monthly chart for every tally afterwards. So 5 tallies = 1 sticker, 6 tallies = 2 stickers, 7 tallies= 3 stickers and so on. This helps my little kinders become VERY familiar with making tallies.

 
It is kind of hard to see in this picture but this is an old picture of monthly sticker charts up under our Smartboard. This was March and there are Shamrocks on the sticker charts.

Now you're probably wondering why it is so important to have all these stickers on our monthly sticker chart right?? Well on the last school day of each month, we count up how many stickers each child has earned. For every sticker a child has earned, they get one pretend penny to go shopping in our class "PENNY STORE". The prizes are usually items from the Dollar Store, dollar section of Target, etc. The students get so excited about this and it teaches them about the value of different coins because we trade out their pennies for higher coins. 

Now it's your turn to go link up!! 

But before I go, I wanted to upload pics of my Back-to-School Night handout I am giving the parents in case anyone wants to take a peek. If you want me to e-mail you a copy that you can edit, leave me your email address in a comment below. 


Hopefully this can be of some use to a few of you!

Sunday, September 16, 2012

Class Applesauce and A Peek At The Week Ahead...

Well we finally got around to making our applesauce and oh my word was it delicious!! I wish I had taken more pictures but I was more focused on keeping my little kinders' fingers away from the sharp apple peeler and the hot crockpot... I figured ya'll would understand ;)

Before we made our class applesauce, we brought all the apples we brought in as a class to the carpet and graphed them by color to see which one we had the most of. I will let ya'll determine below which color won:

 
We had so many red ones that we ran our of room on our graph and had to make two rows of red. Then we went through all of our steps that I outlined in this previous post and I was finally able to take a picture of how yummy it looked:

 
Mmmmm... look at all that brown sugar in there!!

So this past week we were able to do a lot of work with apples, but we have not even made a teeny tiny dent into our apple unit yet! This week I found so many adorable ideas on pinterest that I have just been dying to try and this upcoming week will be perfect for them!! Here are some of the fun things we will be doing this week:

 
These two Johnny Appleseed ideas were way too cute to pass up. I love the cuteness of the Johnny Appleseed circle chart where they list facts they know about Johnny Appleseed. I have done things like this in the past but I have never made my charts as adorable as some of these ladies on pinterest!! They make me feel like I need to bring my "A" game when it comes to cuteness in the classroom. I also love the second craft where they write the sight word "I" (which is our first sight word in our reading series- making this THAT much more applicable) and their name.
 
I thought this little poem with the apple star stamping looked like fun too. I am considering purchasing an apple unit from TPT but there are sooooo many to choose from. Have any of ya'll purchased an apple TPT unit?? If so, would you recommend it and which one was it?? 

I hope you're all having a great weekend!!


Thursday, September 13, 2012

Apples, Apples, and more Apples! Oh... and a Freebie too! :)

This week we have been learning all about apples- one of my favorite things to teach about! Tomorrow we are making our class applesauce and I am so excited I can already taste the cinnamon! So far this week we have read Apples by Gail Gibbons, Ten Apples Up On Top by Theo Lesieg, Ten Red Apples by Pat Hutchins, and The Story of Johnny Appleseed by Aliki. Today we graphed our favorite of those four books and Ten Red Apples won! This was funny to me because the copy we have in our school library looks about 50 years old and I was assuming my little kinders would judge the book by its cover (literally!) and not like it. They proved me wrong though!! Here is our graph:
 
I printed pictures of the covers of the books from the internet to put at the bottom of our graph. It took all of ten minutes but made our graph much cuter :)

Earlier in the week, after reading Ten Apples Up On Top, we used 10 apples to make an apple pattern on two large pieces of white construction paper. My wonderful assistant die cut 150 apples in red, green, and yellow for them to choose from while making their patterns. When they were done, I took pictures of them acting like they were balancing 10 apples on top of their heads. They had so much fun looking at their silly "balancing" pictures!

 
We also made the apple glyphs from my Full Year of Glyphs unit on TPT. I edited the directions a little bit for this one in order to fit our time limit that day and my students needs. Here they are below:
 

All week we have been tasting several foods that are apple flavored or are made from apples. We have been filling out the paper below as we go to document whether we liked the foods or not:
 
You can download this for FREE at my TPT store. Are any of ya'll teaching apples this week?? What are you doing to add a little extra fun into your lessons?

Tuesday, September 11, 2012

Creation Booklets

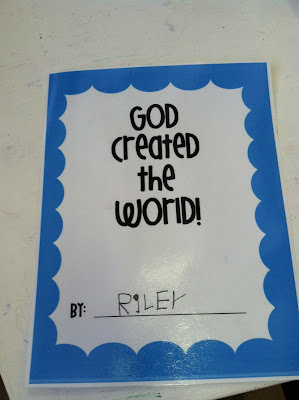
Happy Tuesday! We have finally gotten around to finishing our Creation booklets from my TPT store and I wanted to share them with all of you. These projects took us about a week and a half to make with us focusing on a different day of Creation each day. Here are a few of the pages once they are completed:
This is the front cover.

 Our page for light and darkness with the tissue paper squares.
 
Our cotton ball clouds with our page copied on blue paper.
 
We were going to use stencils to trace in a sun, moon, and stars before painting but I had to leave for a meeting and leave another teacher in charge and didn't want to put her through all that so I made a copy with a sun, moon, and stars already there for them to paint in.

 This is one of my favorite pages!! I love how the blue cellophane makes their fish look like they are under the water!
 
And our last page, the "grand finale" for the parents, is a picture of their child resting to represent how God rested on the 7th day. When they are all finished (our last two pages still have to be laminated) we bind them together and make a book out of them.

I did not upload every single page because that would be too many pictures, but if you want to check it out a little more you can head to my TPT store. In the packet are directions for how to make the page each day.

I keep forgetting to take pictures of our apple crafts and worksheets but will hopefully remember tomorrow. We will have a cute new apple bulletin board tomorrow too so I will try to post pics of that. I hope you're all having a great week!!

Friday, September 7, 2012

Tpt Sale and My Erin Condren Planner FINALLY Came!!

My Erin Condren planner FINALLY came and I am so. freaking. excited!!!! Do any of you have these? And are you as obsessed with yours as I am with mine? Here is the front cover (ignore the purple splotches, those aren't really there!):


Here is the first page on the inside:

Love this page. It is so sweet :)

 
The month at a glance calendar...

 Weekly lesson pages

 I love these little reminder stickers for IEP meetings, staff meetings, assemblies, etc. You can stick them right onto your lesson plan pages or your monthly calendar.
 
A 2012-2013 Calendar at the back. I love the laminated front and back covers to keep it from getting damaged. This is good quality laminating too, not like the super cheap stuff at my school!!

 
There is a folder inside to keep all important papers... Do you see why I am obsessed?? This thing literally has everything!! 
 
It comes with these labels that have my name and school on them. This is a prettier way of marking my belongings than writing my name on them in black permanent marker!!

And finally, because it took so long for them to make my order and ship it they added free colored pens!!

 
I will take some free colored pens any day of the week, so they can screw up my orders in the future if they would like :)

If you are still with me after all those pictures, I wanted to let you know that I am having a sale at my TPT store this weekend!! Everything is 15% off! It ends Sunday at midnight ya'll so head over there quick! 

Have a great weekend!!


Thursday, September 6, 2012

Crock Pot Applesauce for Apple Unit- Yum!

Nothing gets me more excited about cool fall weather than a crock pot (ok, maybe wearing boots and cozy sweaters... but the crock pot is definitely up there!). I love my Crock Pot so much that I bring my Crock Pot in to my classroom a few times a year to cook with my little kinders. Cooking is one of our favorite things because it is fun to do, GREAT measuring practice and following directions practice, and best of all... you get to eat a yummy snack at the end! 

Every fall the kindergarten classes at my school make homemade applesauce to kick off our Apple unit. It is a huge hit and a wonderful reward for good behavior (I pull the classic "I am looking for someone who is following directions to be my next helper" trick ALL. THE. TIME. when cooking!! It takes a great direction follower to follow a recipe, and I love seeing my students who usually struggle to pay attention rise to the occasion)

Here are the easy steps that we follow to make our class applesauce. 

1. Every student is asked to bring in one apple to contribute to our applesauce. I usually buy a bag of whatever apple is cheapest to bring in for the students who do not have one. We do lots of math activities with our apples and then the real fun begins! We have an apple peeler at school that has a gripper on the bottom. This thing is super sharp so I never let the kids use it, I just let them stand around the table while I use it. Ours looks a lot like this one from Bed Bath and Beyond:

2. Once all of our apples are peeled, I cut the long apple spirals into smaller pieces and place them in the Crock Pot. We then measure out two tablespoons of brown sugar, one teaspoon of cinnamon, and a cup of water. We pour all of this into our Crock Pot. Before we put our lid on, we put in two long cinnamon sticks. When all of our ingredients are inside, we turn our Crock Pot on high and let it sit while we go back to our lessons. The applesauce makes our entire hallway smell delicious!! Throughout the day we stir our applesauce a few times and I will break up any large chunks.
3. By the time we come back in from recess, our applesauce is ready! I usually put the applesauce into our bowls and let it sit for a few minutes to cool down. I would rather it be a little too cold than a little too hot! Typically when our applesauce is done it looks similar to the one below:
We will be making our delicious applesauce next week to kick off our Apple unit and I can't wait!! I will be sure to take pictures of the steps of our applesauce making and post them here. 

Are any of ya'll hungry yet from looking at those yummy pictures?? I sure am!